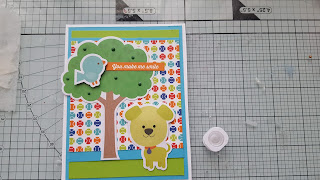
Scrappinsweetie's Escape
Friday, March 1, 2013
Monday, February 18, 2013
Artiste Flower Box
Today I want to share a special gift that Cassandra made for her accompanist for her piccolo solo, which she received a 1 rating on. She picked out the project and papers and made this herself. I think she did a great job on both projects!
She used the new Chanitilly papers from CTMH and the Artiste cartridge. She cut the box part at 4.25 inches and the flowers were cut at 4.25 and 4.50 inches. She glued the box together and put 6 Hershey's Chocolate Nuggets in it. She inked the edges of the flowers and molded them to shape. She added them to the box for the finishing touch.
Labels:
Artiste,
Chantilly Papers
Sunday, February 17, 2013
Exciting News! February Virtual Stamp Kit
I have some exciting news to announce today. The Virtual Stamp Kit is now Available to view. That's right, I got it done early! I am so excited to share this kit with you. I wanted to feature the Buzz and Bumble paper pack along with this set which includes the Honeycomb stamp set, but as I started creating, my mind started racing with other ideas with this stamp set that I had to share.
The kit will include the following:
* Instructions on how to make the 4 cards shown above, including the card bases and envelopes.
*It will include pre-cut shapes in case you do not have the Cricut cartridges needed to cut the shapes as well as stamped sentiments from stamps sets not included in this set.
*Cutting dimensions will be provided as well as a list of cartridges and stamp sets used for the sentiments. Making it easier for you to re-create these cards.
*A supply list will be provided when you pay me for this virtual stamp kit so that if you want to order more of the supplies used to make these cards on your own you may place your order when you sign up for the Stamp Kit.Or if you need the ink colors used in this class you can order those, too, as the ink is NOT provided, nor is the adhesive.
*You need to e-mail me scrappinsweetiectmh@gmail.com if you want this kit. I need to know if you want this kit by March 3rd. This is a short time because I will be having an Easter Virtual Club as well and Easter is early this year at the end of March. If you want to pre-order the Easter kit with this kit I will give you a $5.00 discount off of both kits which means you will get 2 kits for $45.00. The Easter kit will include a 3D project in it. If you only want the March Honeycomb kit the price is $25.00 which includes the size "C" Honeycomb stamp set. If you need the kit mailed, a $6 shipping fee will be added. This is different than some Virtual kits which you have to buy the stamp set separately. All of my Virtual Stamp Kits will include the stamp set that is featured.
* Please feel free to e-mail me with any questions that you may have. This is my first month of doing this so there may be a few kinks that needs to be worked out, but I have tried to cover all the bases and am happy to answer any questions that you have.
Monday, February 11, 2013
Virtual Stamp Club
I am excited to let the cat out of the bag and tell you that I am starting a virtual stamp club in March that will be featuring the new Buzz and Bumble papers and the Honeycomb stamp set. Pricing and details are being worked out. In addition to the virtual stamp club, I will also be making scrapbook page kits that will make your scrapbooking so much faster and easier. Great for those of you short on time! This is the first of many new things coming so stay tuned!
Friday, February 8, 2013
Fabulous You
Hello everyone! I am excited to be sharing here again. It's a new year and I have a lot planned for this little place including a new monthly club that I am still working out a few details on. Today I wanted to share with you a new card that I made from 2 of our new stamp sets.
Supplies:
D1477 Universal Backgrounds Flair
C1533 Fabulous You Seasons and Nature
Z2103 Bamboo Ink
Z2111 Chocolate Ink
Z1114 Piercing Kit
3505 Watercolor Pencils
1771 Waterbrush
I stamped the Fabulous You image on a colonial white scallop with bamboo ink. I then went over the bigger stems with a green watercolor pencil and blended it in with the waterbrush. I colored the bird and flowers in the same manner. I then used the piercing kit to pierce the paper. Chocolate ink was used to stamp the diamond and the friends forever sentiment and finally to finish the card base off I used bamboo and the script stamp for added depth. I wrapped the scallop with some fiber I had laying around and added a few pop dots to pop the scallop up off the card. I think it turned out very pretty. If you would like to create your own card like this all supplies can be ordered through my Scrappinsweetie's Escape CTMH site. Make sure it says that Laura Wolff is your consultant. I hope I have inspired you today!
Monday, January 7, 2013
A little bit of Love in the air!
Today I have been in the Valentine's mood after checking e-mails and blogs I was inspired to make this card. I think this little teddy bear cupid is so very cute and he made the perfect card for that special someone.
I used the Teddy Bear Parade cricut cartridge for the bear cut at 3". His wings were sprayed with Bronze Glimmer Mist for a bit of sparkle which isn't showing well in the picture. The red heart strip was made by stamping red cardstock with hearts border stamp from the Whoo's your Valentine stamp set using versamark ink. It was then cut and punched with the Martha Stewart punch (I don't know the name of it). The pink hearts were cut with the CTMH Artiste cartridge and stamped with the coordinating hearts from the Whoo's your Valentine set. The Love banner was cut by hand and stamped again with the Whoo's set. The inside was sponged with the blush ink from CTMH and stamped using the January Stamp of the Month set.
The stamp sets used are the Whoo's your Valentine which comes in the Whoo's your Valentine's special kit available only until January 31 with a qualified order. The other set is the January Stamp of the Month and can be bought with a qualified order again by January 31. These are both great stamp sets that can be used in many many ways. You can order by going to Scrappinsweetie's Store or e-mail me at scrappinsweetiectmh@gmail.com I would be happy to help you place your order. So here's to adding some love to the air!
Saturday, January 5, 2013
Cascading Card for Workshop
Hello everyone and Happy New Year! As promised here is one of the first cards that I will be doing as a workshop. We will be creating one smaller candy tube project to complete this class but due to the time and all the techniques that you will be learning with this card I have decided to offer just these two projects for this class in effort to not overwhelm you and keep the class time manageable.
This card uses the Whoo's Your Valentine special stamp set available now until the end of January with a $35 dollar order for only $10 if you would like to have your own set which includes 12 treat tubes, 12 die cut boxes, 3 cardstock sheets, and the stamp set.You can find more information about this special set on my facebook page: Scrappinsweetie's Escape
I will be posting the date, time, and cost in the next few days so check back to book your spot in the class.
Friday, December 21, 2012
Artiste- Anything Goes Blog Hop
Welcome to our "Anything Goes with the Artiste" Blog Hop where we are showcasing the exclusive Artiste Cricut cartridge which can be purchased exclusively through a Close to My Heart Independent Consultant. This will be our last Artiste blog hop for 2012.
Our "theme" for this hop was to create anything we wanted with the Artiste Cricut cartridge. And honestly, you can pretty much create anything and everything with the Artiste so this was not a difficult thing to do.
If you just happened to come to this blog, you should start at the beginning at Lucy's blog Love to Create
If you came here from Jennifer's blog, 4 Hearts Scrapbookingnk then you're in the right place!
My project is a cute little reindeer gift bag. Now, I did NOT come up with this idea on my own. I have not had the time to be really creative but when I saw this I knew it was perfect for a little gift for my little cousin. I got this idea from Rachel Loesch at Cricut with Heart. She has some very good instructions and pictures listed on her blog for her post so I encourage you to take a peek and leave her some love too.
Here is a picture of my reindeer girl bag
I used the Artiste cartridge to cut the bag on pg. 77 at 4-1/2". I used the leaves for the ears found on pg. 54 at 1" and 1/2" for the inside (use the shift key for the inside cut). Then I cut the antlers from pg. 43 at 2". I used the art philosophy cartridge to cut a 1" nose which I then glittered. I made her "cute" with some green googly eyes that I got from Wal-mart. I used chocolate and desert sand ink to finish it off. I added a zip strip from one of the CTMH papers and a little red polka dot bow.. I think she turned out really cute and I hope you enjoy her!
The next stop on your blog hop fun is Penny from It Makes Total Cents.
Here's the entire blog hop lineup in case you get lost along the way:
- Lucy ~ Love 2 Create
- Darla ~ Caution: Crafting is Contagious
- Diana ~ Diana's Free Moments
- Jennifer ~ 4 Hearts Scrapboooking
- Laura ~ Scrappinsweetie's Escape
- Penny ~ It Makes Total Cents
- Theodora ~ Celebrate Crafts
Friday, December 14, 2012
Family and Friend Blog Hop
Welcome to our "Family and Friends" Blog Hop where we are showcasing the exclusive Art Philosophy Cricut cartridge which can be purchased exclusively through a Close to My Heart Independent Consultant. This will be our last Art Philosophy blog hop for 2012.
We will be showing you creations made using the Art Philosophy cartridge for our family and friends.
If you just happened to come to this blog, you should start at the beginning at Lucy's blog - Love 2 Create
If you came here from Jennifer's blog, 4 Hearts Scrapbooking, then you're in the
right place!
My project is a fun little present that one of my family member is going to be happy to get. I altered a 6x6 white tile that I bought at Lowes with some vinyl. I used both the Art Philosophy cartridge and the Artiste cartridge to make it. Here are some pictures showing how I did this.
I used the Artiste cartridge for this Merry Christmas saying. It is found on pg. 80 of the handbook. I cut it out of red vinyl at 5.25".
I use clear contact paper as my transfer paper. It is much cheaper than the actual vinyl transfer paper and much easier for me to find locally.
Next I added the Holly Leaves cut from the Art Philosophy cartridge found on pg. 46. I cut them at 1.5" and put them on the tile. I also cut the holly berried but I didn't like the look of them so I added some bling to jazz it up just a bit. Here is the final product. I hope that the recipient is happy with it when they open the package!
The next stop on your blog hop fun is Priscilla at Priscilla's Paperie. Thank you for hopping along with us and I want to wish each of you a very Merry Christmas!
Here's the entire blog hop lineup in case you get lost along the way:
- Lucy ~ Love 2 Create
-
Darla ~ Caution: Stamping is Contagious
- Diana ~ Dian's Free Moments
-
Jennifer ~ 4 Hearts Scrapbooking
-
Laura ~ Scrappinsweetie's Escape
-
Priscilla ~ Priscilla's Paperie
-
Stephanie ~ The Quilted Scrapper
- Kindred Hearts ~ It Makes Total Cents
Friday, November 2, 2012
Bears...Teddy Bears Parade!
Good Morning Everyone!
Welcome to our 3-day hop showcasing, you guessed it, bears! Well, Teddy Bears to be precise. Teddy Bears from Cricut's Teddy Bear Parade!
"A Teddy bear is a faithful friend
You can pick him up at either end.
His fur is the colour of breakfast toast,
And he's always there when you need him most."
We hope you will be inspired by our teddy bear creations. As you hop along from blog to blog, you may see some blog candy being offered. Please follow the blogger's instructions to enter and be eligible to win.
If you just happened on my blog, please start at the beginning of our hop with Janis of Pause Dream Enjoy http://pausedreamenjoy.blogspot.com/
If you came here from Sheree of Boots and Bling Time, you're in the right place!
I have created this fun Turkey Bear for the hop. I have put him on a 12x12 tile that I got from Lowes. I used several different colors of adhesive backed vinyl and cut it with my mini cricut at 6". The setting I used were blade depth 3, blade pressure 3, and the speed to 4. Vinyl cuts as smooth as butter with my mini. I use clear contact paper as my transfer instead of spending money on real transfer vinyl. I also used the CTMH Artiste cartridge for the "give Thanks" phrase that was cut at 8.5 inches. I layered it all together and this is what you get. I think he is gobbleish-ish.
The next step on your Teddy Bear trail is, Tara of Craftin Desert Diva's
Here's the entire lineup in case you get lost along the way:
1. Janis ~ http://pausedreamenjoy.blogspot.com/
2. Lucy ~ http://love2createitall.com
3. Sheree ~ http://bootsandblingtime.blogspot.com/
4. Laura W.~ http://scrappinsweetiesescape.blogspot.com
5. Tara Barnes Bruening ~ http://www.craftindesertdivas.blogspot.com/
6. Tracy Matos ~ http://tracyscricutcorner.blogspot.com/
7.Sharon ~ http://meemeescreations.blogspot.com
8. Kathi ~ http://blogbykathi.blogspot.com/
9. Mary ~ http://www.cardztv.blogspot.com/
10.Michelle - http://mumoftwoblog.blogspot.com
11. Elaine - http://www.expressionsbyelaine.blogspot.com
Thanks for stopping by! Don't forget to stop by tomorrow for another day of teddy bear creations!
Labels:
Artiste
Subscribe to:
Posts (Atom)


